If you want to learn video editing on your mobile, then you have probably heard about Alight Motion. It is one of the most popular mobile editing apps that offers professional features in a simple interface. Whether you make YouTube videos, Instagram reels, TikTok content, or personal projects, Alight Motion helps you create high-quality visuals using easy tools. To use this app properly, you must understand Alight Motion basic tools and functions, because these are the foundation of every edit you will ever create.
Understanding Alight Motion Main Interface
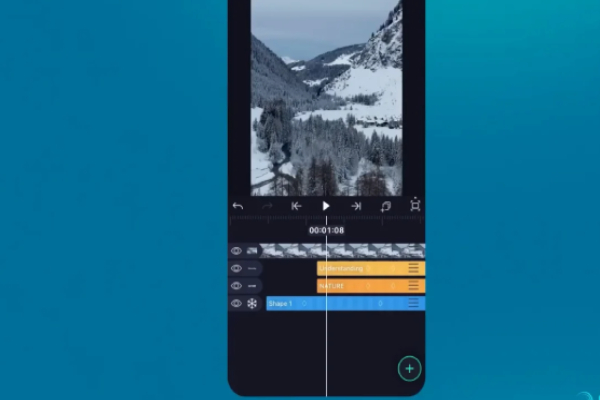
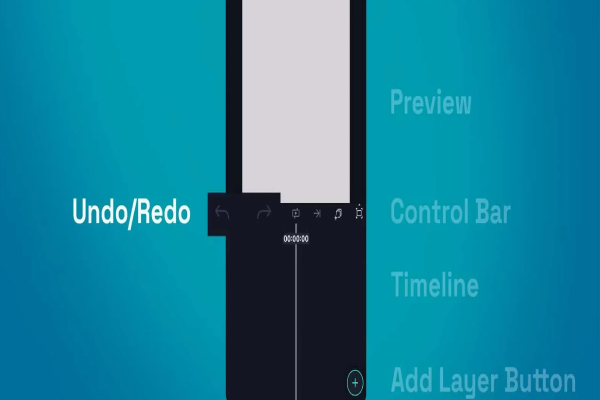
When you open the Alight Motion app for the first time, the main interface may seem complicated. But once you understand its layout, everything becomes easy. This section will explain the main dashboard, timeline, layers, and basic elements so you can comfortably navigate the app without getting lost.Basic Tools and Functions
Understanding the interface is the first step in mastering Alight Motion basic tools and functions, and once this becomes clear, editing becomes twice as easy. Spend a few minutes exploring the interface before starting any project, and soon it will feel natural.
Adding and Managing Project Layers
Layers are the heart of Alight Motion Basic Tools and Functions. Anything you add — video, photo, shape, audio, or text — becomes a layer. The power of Alight Motion comes from how you manage these layers. If you understand layer control, you can create smooth edits, animations, and effects without any difficulty.
When you add a media file, a new layer automatically appears in the timeline. You can drag it forward or backward to adjust when it starts and ends. If you want a clip to appear later in the video, simply move its layer to the right. If you want it to appear earlier, move it to the left. This simple method gives you full control over timing.
You can also place layers above or below each other. The topmost layer always appears in front in the final video. For example, if your text layer is above the video layer, the text will be visible on the video. But if the text layer goes behind the video layer, you won’t see it. This concept is extremely important when creating aesthetics, motion graphics, or transitions.Basic Tools and Functions
Alight Motion also allows you to duplicate layers. This is useful when you want to create multiple elements with the same design or animation. Instead of repeating work, duplicating layers saves time. You can also group multiple layers together to move or animate them at the same time.
If your project becomes crowded with too many layers, you can rename them for clarity. Organized layers help you work like a professional, especially in complex edits. Understanding how to control, arrange, and animate layers is one of the most essential Alight basic tools and functions, and mastering it will significantly improve your editing skills.
Using Basic Editing Tools Properly
Alight Motion offers several basic editing tools that help you trim, cut, adjust, and arrange your media. These tools may look simple, but they are extremely powerful when used correctly. Understanding these functions ensures that your edits look clean and professional.
The trimming tool allows you to shorten or extend media in the timeline. If your video clip is long, you can trim off the unwanted parts while keeping only the important portion. This helps maintain viewer attention and removes unnecessary footage. The split tool is used to divide one clip into two parts. This is useful when you want to add effects, transitions, or speed changes to only specific sections.
The move tool helps you drag layers around the screen. You can change their position, rotate them, or adjust their size. The pivot point (marked with a small circle) shows the center from which rotation happens. By moving this pivot point, you can create dynamic animations like swinging, spinning, or bouncing effects.
Cropping tools allow you to cut parts of an image or video. This helps remove distractions and focus on the main subject. Masking tools are more advanced; they let you hide or reveal chosen parts of a layer. Beginners should practice these tools slowly because they unlock advanced editing possibilities.
All these basic tools are essential for maintaining clean and professional edits. When you learn them, you gain complete control over your timeline and visuals. That is why learning these Alight Motion basic tools and functions is the foundation of good video editing.
Working With Keyframes for Animation
Keyframes are one of the most exciting features of Alight Motion. They allow you to animate any object by setting motion points at different positions. Understanding keyframes is important because without them, you cannot create smooth transitions, movements, effects, or professional animations.
There are many properties you can animate with keyframes:
- Position
- Scale
- Rotation
- Opacity
- Color
- Skew
- Distortion effects
- Text properties
- Masks
Mastering keyframes is one of the most powerful Alight Motion basic tools and functions, and learning them will take your editing skills to the next level.
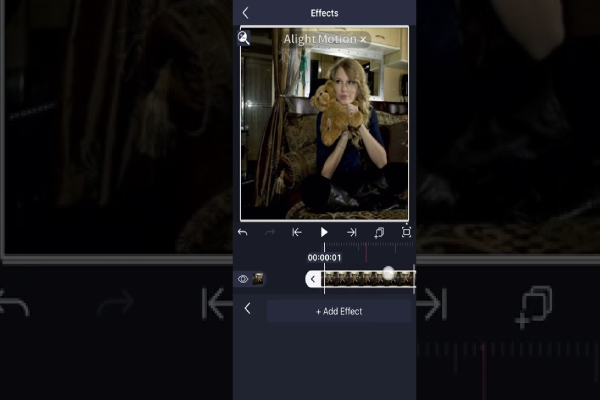
Adding Effects and Visual Enhancements
Alight Motion offers hundreds of effects that can completely transform your video. These effects help you enhance color, add movement, create depth, and build unique styles. Understanding how to use effects correctly is important because too many effects can make a video look messy, while the right balance makes it beautiful.
Some common effects include:
- Glow
- Motion Blur
- Gaussian Blur
- Color Tune
- Exposure
- Vignette
- Shadow
- Stroke
- Text Effects
- Particle Effects
- Distortion Waves
- Ripple
- Linear Blur
- Fun & retro filters
But remember, effects must be used carefully. Overloading effects can make your video appear too artificial. Use them with balance and purpose. When used correctly, effects become one of the most powerful Alight Motion basic tools and functions that improve the overall quality of your project.
Exporting and Finalizing Your Video
Once your editing work is complete, the final step is exporting your project. Exporting means saving your video in a format that you can upload or share. If this step is done incorrectly, your video may lose quality. That’s why understanding export settings is essential.
Alight Motion allows you to export in different resolutions such as 720p, 1080p, and even 4K depending on your device. You can also choose FPS (frames per second). Higher FPS makes motion smoother. For reels or TikTok, 30 FPS or 60 FPS is often recommended. For cinematic videos, 24 FPS is popular.
Bitrate is another important setting. A higher bitrate gives better quality but results in a larger file size. For social media, medium bitrate is usually enough. But if you want maximum quality, choose a higher bitrate.
- You can export your animations as:
- Video
- GIF
- PNG Sequence
- Image
- XML for advanced use
Once export settings are finalized, tap the “Export” button. Depending on your project size, the rendering process may take a few seconds or minutes. Make sure your device has enough storage because Alight Motion creates high-quality files.
Exporting properly ensures that all your hard work looks clean and professional when viewed on any platform. Understanding the export settings is one of the essential Alight Motion basic tools and functions needed to complete your project with the best output quality.
Downloading and Installing Alight Motion
First, install Alight from the App Store (iOS) or Google Play Store (Android), or Aliht Motion . The app is free to download with in-app purchases for premium content.
Once installed, launch the Alight Motion app and familiarize yourself with the clean, intuitive interface. Time to start creating!